Cookies and Cream Cookies Recipe That You’ll Crave Daily
- Why chilling your dough is the single most important step beginners skip
- The exact moment to pull your cookies from the oven (before they look done)
- How to get thick, bakery-style cookies using one simple technique
- Which Oreo pieces to crush fine vs. which to keep chunky — and why it matters
- The 5-ingredient magic ratio that makes these taste far more complex than they are
Let Me Be Honest With You
I’ve made a lot of cookies in my life. Macarons that took three attempts, croissants that kept me up at 2 a.m., soufflés that collapsed dramatically the second I opened the oven door. But you know which cookie I get asked about the most? This one. A simple, fudgy, Oreo-loaded cookies and cream cookie that takes about 30 minutes from start to finish.
And here’s the thing — it’s beginner-friendly on purpose. Not dumbed-down. Not shortcuts that sacrifice flavor. Just a clean, honest recipe where I explain why each step matters, so you actually understand what you’re doing in that kitchen instead of just blindly following instructions and hoping for the best.
So whether this is your first time baking cookies from scratch or you’ve tried a dozen recipes and they always come out flat and sad — this is the one. Let’s get into it.
What Makes These Cookies So Good?
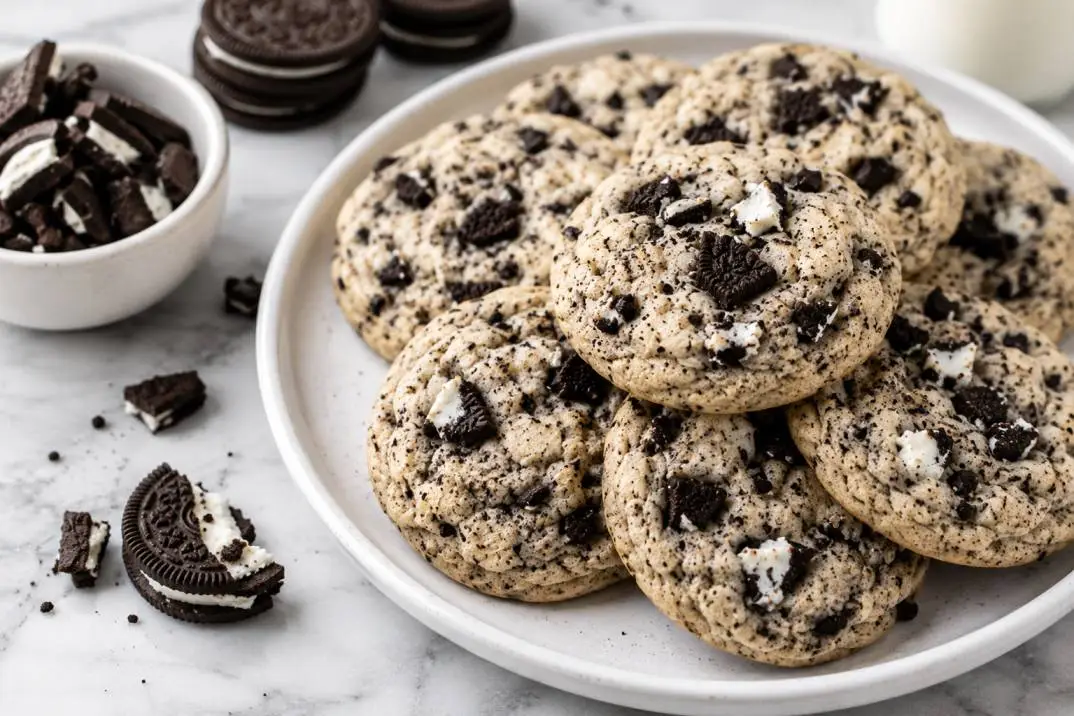
Before we even touch an ingredient, let’s talk about what we’re building here. A truly great cookies and cream cookie has three things going on at once: a crisp, slightly golden edge, a soft and almost fudgy center, and chunks of Oreo baked into every bite. The cream filling from the Oreos melts into the dough and adds this subtle, almost vanilla-cream sweetness that you can’t quite put your finger on — but you absolutely notice when it’s missing.
The magic is in the ratio. Enough butter to make them rich, enough flour to hold them together, and enough Oreos that you get cookie in every single bite. Sound simple? It is. And that’s exactly the point.
Cookies and Cream Cookies Recipe That You’ll Crave Daily
Ingredients
Step-by-Step: How to Make Cookies and Cream Cookies
1
Crush Your Oreos — But Not All the Way
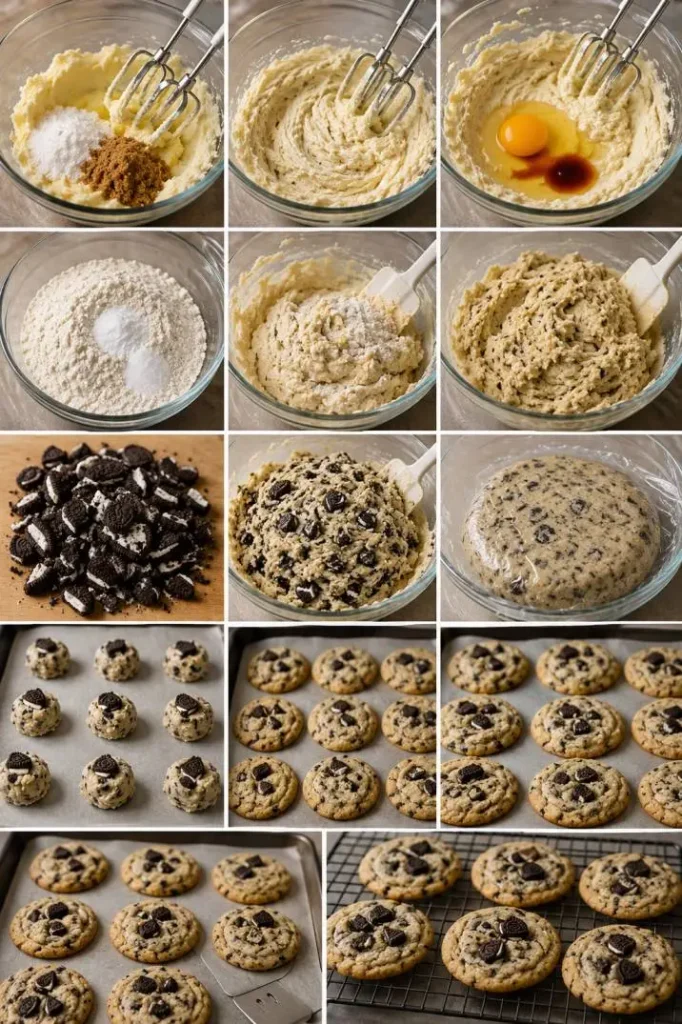
Take 15 of your Oreos and place them in a zip-lock bag. Use a rolling pin to crush them — but stop before they turn to dust. You want a mix: some fine crumbs (they’ll blend into the dough) and some pea-sized chunks (they’ll give you that visible cookie-in-a-cookie look). Break the remaining 5 Oreos into rough quarters by hand and set them aside. Those go on top of each ball of dough before baking for a dramatic, bakery-worthy finish.
2
Whisk Your Dry Ingredients
Whisking — not stirring — is important here. It aerates the flour slightly and ensures your baking soda is evenly distributed so you don’t get one cookie that rises perfectly and another that’s flat. Set this bowl aside.
3
Cream the Butter and Both Sugars
This is the most important step in the whole recipe, so don’t rush it. Using a hand mixer or stand mixer, beat your softened butter with both sugars on medium-high speed for a full 3–4 minutes. The mixture should turn noticeably lighter in color and look almost fluffy. This process — called creaming — incorporates tiny air pockets that help your cookies rise and develop that soft, chewy center. If your butter is cold, your cookies will be dense. If it’s melted, they’ll spread too thin. Softened (meaning it leaves an indent when you press it, but doesn’t squish) is the sweet spot.
Cold eggs can cause your butter mixture to “break” — turning grainy and separated. Pull your eggs out of the fridge at least 30 minutes before you start.
4
Add Eggs and Vanilla
Add your eggs one at a time, beating well after each addition. The dough should look smooth and cohesive at this point — not curdled or streaky. If it does look a little broken (you’ll know because it looks grainy), don’t panic. A tablespoon of flour beaten in usually brings it back together.
5
Fold in the Dry Ingredients
Add your flour mixture to the wet ingredients in two additions, mixing on low speed just until the flour disappears. Stop the moment you no longer see streaks of flour. Overmixing develops gluten, and too much gluten means tough, dense cookies instead of tender ones. A few folds with a rubber spatula at the end are totally fine and give you more control.
6
Fold In Your Oreos (and Chips, If Using)
Now fold in your crushed Oreo mixture and white chocolate chips using a rubber spatula. Do this gently — you want those Oreo chunks intact, not pulverized further. The dough will look dark and speckled with black cookie pieces. It should smell incredible at this point. (Tasting the dough is optional. But encouraged.)
7
Chill the Dough — Don’t Skip This
Cover the bowl with plastic wrap and refrigerate for at least 30 minutes (up to 72 hours if you’re planning ahead). Chilling firms up the fat in the dough, which means your cookies will spread less during baking, resulting in thicker, chewier centers . This is the single step most beginners skip — and the one that explains why your cookies sometimes spread into sad, flat puddles.
8
Preheat, Scoop, and Top
Preheat your oven to 375°F (190°C) and line two baking sheets with parchment paper. Scoop your dough into balls roughly 2 tablespoons each — an ice cream scoop makes this incredibly easy and gives you uniform cookies that bake evenly. Place them 2 inches apart on the sheet. Then press one or two of those reserved Oreo quarter-pieces into the top of each ball. This is purely aesthetic, but it also signals to everyone eating them exactly what they’re getting into.
9
Cool on the Pan — Then on a Rack
Let the cookies rest on the baking sheet for 5 minutes before transferring them to a wire rack. This rest time is when the structure sets. Moving them too early can cause them to break apart. After 10 minutes on the rack, they’re ready to eat. Or, if you have the patience of a saint, wait until they’re fully cooled — the flavor actually deepens as they cool down and the Oreo pieces settle into the dough.
The Result You’re Looking For
When done right, these cookies have edges that offer just a little resistance — a gentle snap — before giving way to a center that’s almost brownie-like in its softness. You’ll see dark Oreo flecks throughout, cream filling that’s essentially dissolved into the dough creating pockets of sweetness, and those big chunky pieces on top that stayed whole during baking.
Though honestly, in most households, they don’t last past day two.
🍪 Frequently Asked Questions
What is the most requested cookie recipe?
Consistently, the most requested homemade cookie recipe is the classic chocolate chip cookie — but cookies and cream cookies have surged dramatically in popularity in recent years, becoming one of the top 3 most searched cookie recipes online. Their appeal is universal: they combine two beloved things (cookies and Oreos) into one, and they’re easy enough for complete beginners to nail on the first try. In home kitchens and bakeries alike, they’re what people ask for by name.
What are the 5-ingredient magic cookies?
Five-ingredient cookies are a popular baking shortcut where you strip a recipe down to only the essentials that make it work. For a cookies and cream version, that typically means: butter, sugar, egg, crushed Oreos, and flour — nothing extra. The results are surprisingly good because Oreos themselves contain fat, sugar, and flavor, effectively doing the work of several separate ingredients. They won’t have the same depth as a full recipe, but they’re a fantastic option when you want homemade cookies fast with minimal pantry raiding.
What cookies are healthy to eat every day?
Honestly? No cookie is a health food — and any recipe that tells you otherwise is selling you something. That said, if you’re eating cookies as part of a balanced diet, smaller portions and recipes made with real, whole ingredients (like this one) are always better than highly processed store-bought versions. Oat-based cookies, nut butter cookies, and dark chocolate options tend to have more nutritional value. For cookies and cream specifically, using less sugar, swapping one egg for a flax egg, or reducing the butter slightly can make the recipe lighter without dramatically changing the texture.
What is Snoop Dogg’s cookie recipe?
Snoop Dogg’s famous cookie recipe — shared publicly and widely circulated online — is a classic drop sugar cookie made with butter, sugar, eggs, vanilla, flour, and baking soda. What makes it “Snoop’s” is less about exotic ingredients and more about the generous hand with vanilla and the slightly underbaked, soft center that he specifically calls out as non-negotiable. It’s a reminder that the best recipes are often the simplest ones — and that technique, not complexity, is what separates a good cookie from a great one. That philosophy applies directly to this cookies and cream recipe too.
One Last Thing Before You Bake
The difference between a baker who gets great results and one who doesn’t usually isn’t talent — it’s patience. Patience to cream the butter properly. Patience to chill the dough. Patience to pull the cookies out before they look ready. That’s it. Follow those three things and this recipe will work for you every single time.
Now go make something delicious. Your kitchen is about to smell absolutely incredible.
Did You Try This Recipe?
Share your results in the comments below — tell us how your batch turned out, what you changed, or which step surprised you the most. Every baker’s journey is different, and your experience might be exactly what someone else needs to read.Leave a Comment & Rate the Recipe ★